This blog article covers how to technically integrate Lookout for Work Mobile Thread Defense solution into VMware Workspace ONE UEM device management. Lookout is Cloud-based Service for almost a decade specialized in iOS and Android mobile security fleet management. Lookout s a long-term VMware Trust Network partner and early adopter of product integrations into VMware Workspace ONE solutions.
I was motivated to create this blog by one of my large customers investing into a MTP solution on top of the security features that almost any UEM/EMM/MDM product provides. Credits and kudos to Lookout Sales team Germany who provided me the demo tenant. The test have been done with WS1 UEM 20.10+ back in December 2020.
The Lookout Deployment Guide with VMware Workspace ONE is the main guide you should follow to do the integration. It’s good and pretty straight but as usual with most PDF docs they get outdated at some parts. So this blog will focus on my personal best practices and corrections you must do.
Overall Solution Approach
The following processes will be implemented once Lookout detects a risky device:
- Lookout detects a risk on a device and mark it as low, medium or high
- Lookout ‘tags’ the affected device in WS1 UEM with a low, medium or high tag
- WS1 UEM automatically installs a related low, medium or high app on the device
Let’s call this a TRIGGER APP- Android: Create 3x Google Managed Play Store ‘Web Apps’
- iOS: Choose 3x Apple App Store apps
- WS1 UEM compliance engine detects the low, medium or high risk app on the device
- WS1 UEM marks the device as non-compliant and execute the related policy actions
The following processes will be implemented once the user remediate/’heals’ his device
- Lookout detects that the device is not at risk anymore
- Lookout removes the low, medium or high ‘tag’ in WS1 UEM for this device
- WS1 UEM removes the low, medium, high TRIGGER APP
- WS1 UEM compliance engine will mark the device as compliant
- WS1 UEM compliance engine will remove the non-compliant restrictions from the device
Index & Version Info
### Index
Lookout Portal - First Actions
Step 1: Setup the Basic Lookout MDM Connector configuration
Step 2: Finalize Lokout MDM Connector Setup
Step 3: Lookout Enrollment of Devices
Step 4: Lookout - Enforce Security Threads
Step 5: Automate WS1 UEM device action upon Lookout risk

### Version Info
# none yet

### About the Author
Oliver Kluenter - Vita URL here - Contact me to discuss on LinkedIn here
Lookout Portal – First Actions
### Lookout Portal - First steps
# When you request a free trial account pick a personal email address in case your company already has an domain based SSO integration for user authentication for Lookout.
# After login into Lookout Management Portal download the latest Lookout Deployment Guide with VMware Workspace ONE from within the Lookout Support Portal

# Note done the Default Group => "Global Enrollment Code"
- Go to System / Account > syntax is <XXXXXX> alphabetic string
- required for later configuration purposes

### Lookout Support Portal
# Create your Support account - Within Free Trial portal click on SUPPORT tab.
# Create a Lookout Support ticket and request get multi-MDM Connectors feature enabled.
# Create a Lookout Support ticket and request to get the latest Dashboard version.
Step 1: Setup the Basic Lookout MDM Connector configuration
WS1 UEM – Create Admin Account
The WS1 UEM Admin Account is used by Lookout for authentication / remote login purposes. You can use existing WS1 UEM Admin account, nevertheless you might want to use a separate admin for each 3rd party integration to obtain the overview.
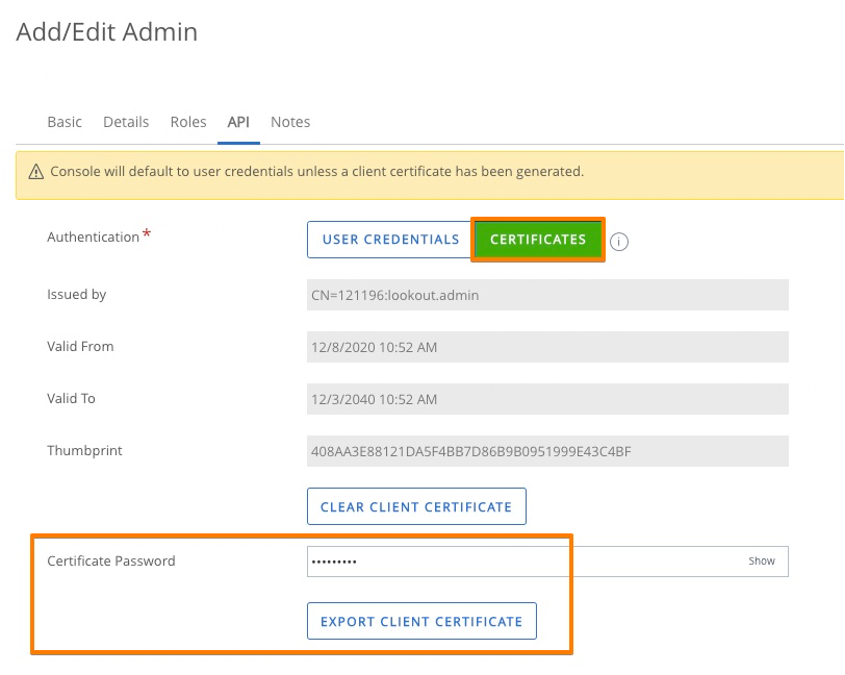
### WS1 UEM - Create Admin Account
- e.g. create new Basic’ administrator ‘lookout.admin’
- assigned 'Console Administrator" permissions
- Enabled certificate based authentication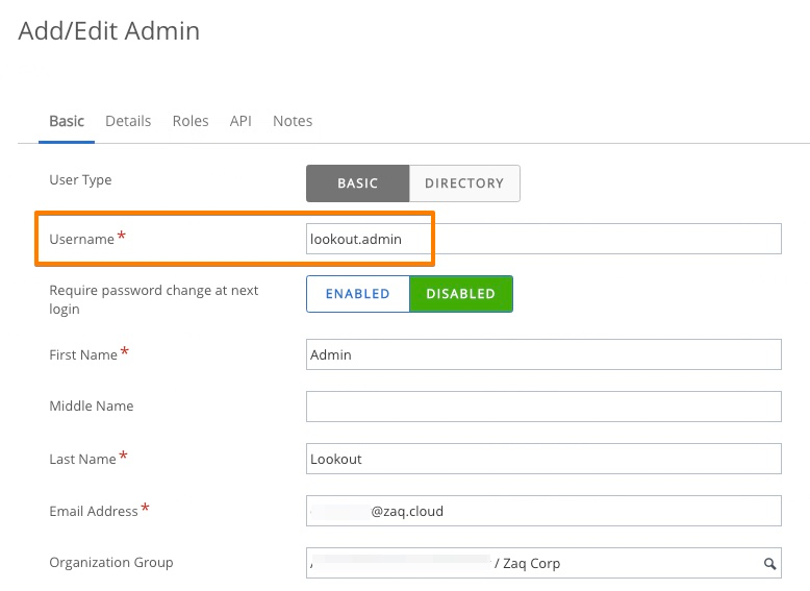

WS1 UEM – Create REST API key
### WS1 UEM - Create REST API key
- API key is used by Lookout to execute remote commands to your WS1 UEM tenant
- WS1 UEM Console: Settings / Advanced / API / REST API
- ADD a new Service api object and assign ADMIN permissions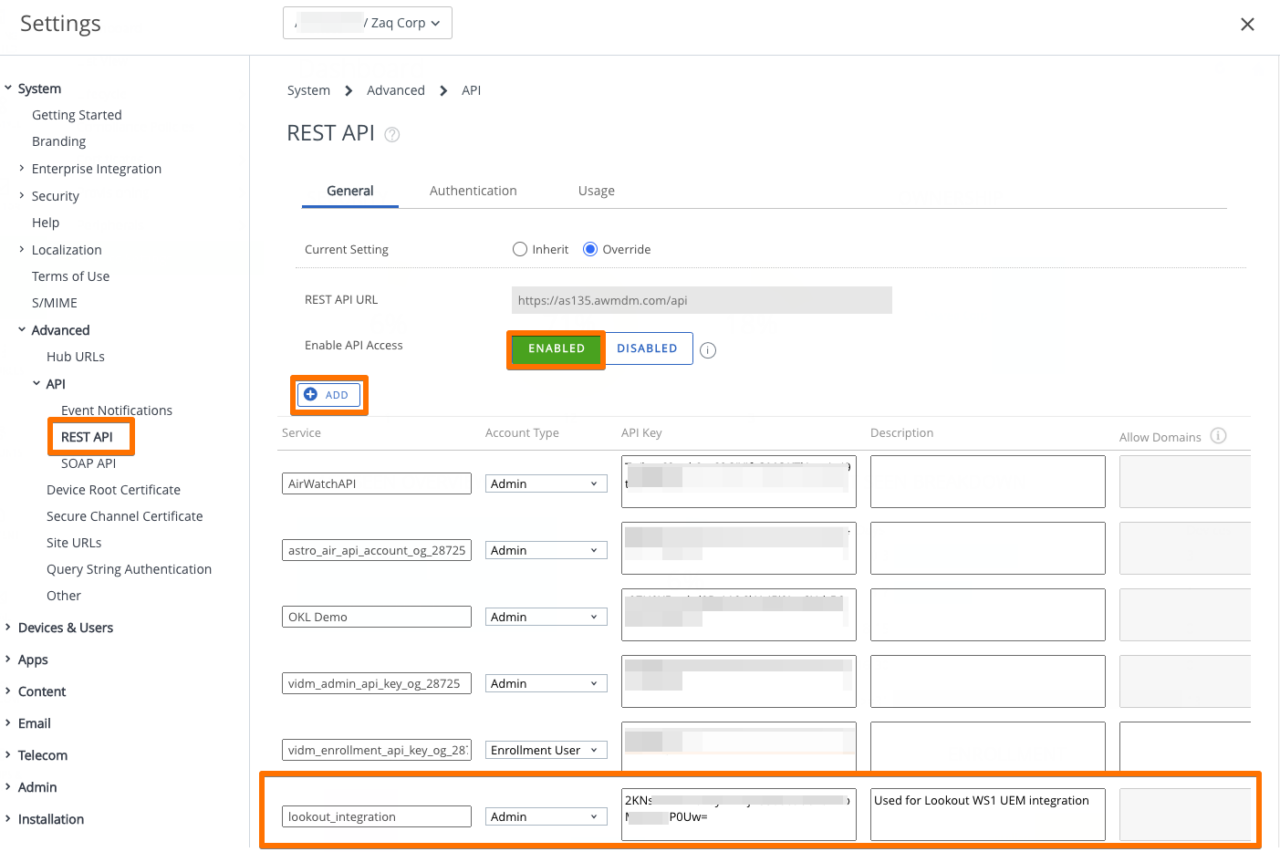
Lookout – Basic MDM Connector Setup
### Lookout - Basic MDM Connector Setup
- Go to Lookout Console / Integrations / Choose a product to setup => Workspace ONE MDM Connector
- Section 'Connector Settings' > apply the configuration
- For authentication select ‘Certificate Authentication’ and import the certificate
- Validate connector status in the Lookout / Integrations tab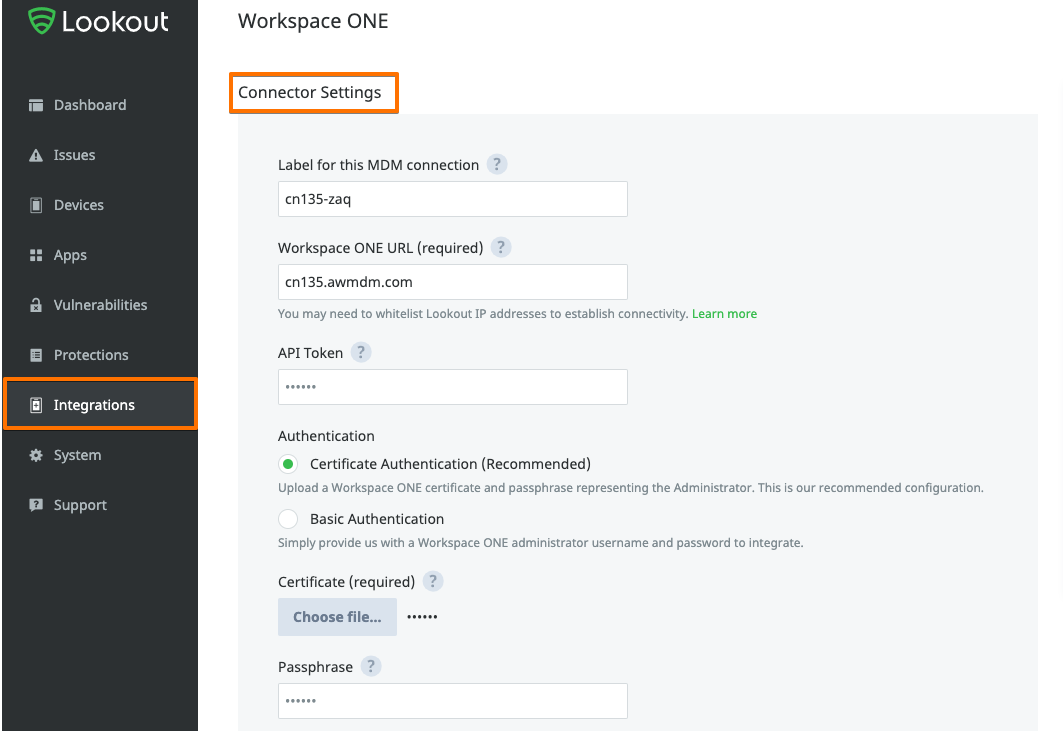

Step 2: Finalize Lokout MDM Connector Setup
WS1 UEM – Prepare Smart Groups und Custom Tages
### WS1 UEM Console - Smart Groups
# Define the WS1 UEM devices that should be managed with Lookout for Work:
e.g. create Smart Group "lookout-managed devices" + add iOS / Android devices to be managed with Lookout into this Smart Group.
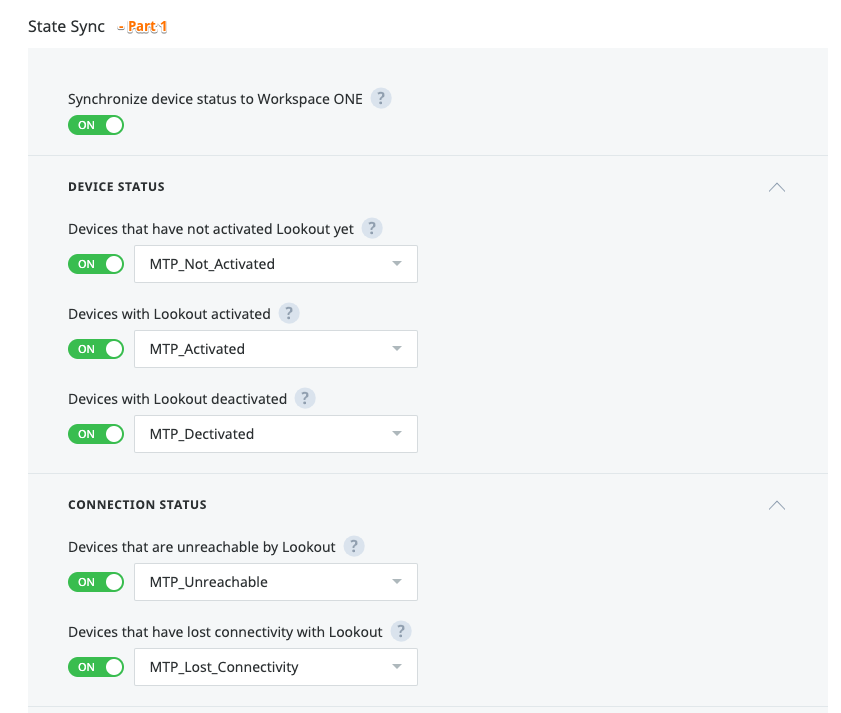
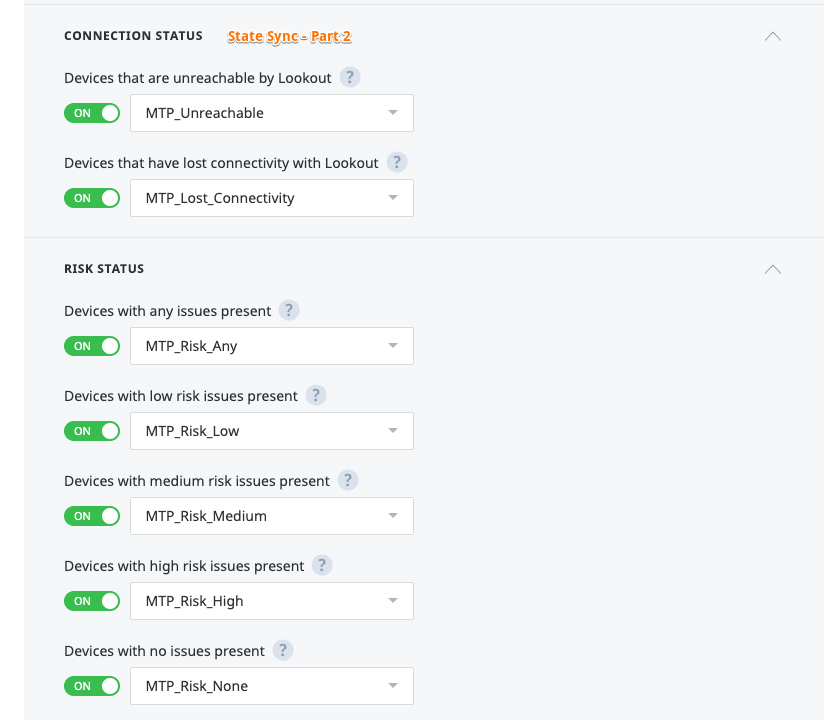
### WS1 UEM Console - Custom Tags
# Used by Lookout to signal one or more device status to correspondent WS1 UEM device objects
# At a later stage these tags will be used to automate WS1 UEM action depending on the device actions, e.g. if the device is at high risk, you might want to enterprise wipe it immediately or quarantine it.
# WS1 UEM Console: Settings / Devices & Users / Advanced / Tags
# Create the following Tags:
MTP_Not_Activated
MTP_Activated
MTP_Deactivated
MTP_Unreachable
MTP_Lost_Connectivity
MTP_Risk_Any
MTP_Risk_Low
MTP_Risk_Medium
MTP_Risk_High
MTP_Risk_None
Lookout – Finalize MDM Connector Setup
# Go back to Lookout Console / Integrations > Select your Connector entry, and apply the rest of the Connector configurations.
- You may want to change some of those depending on the use case you want to test.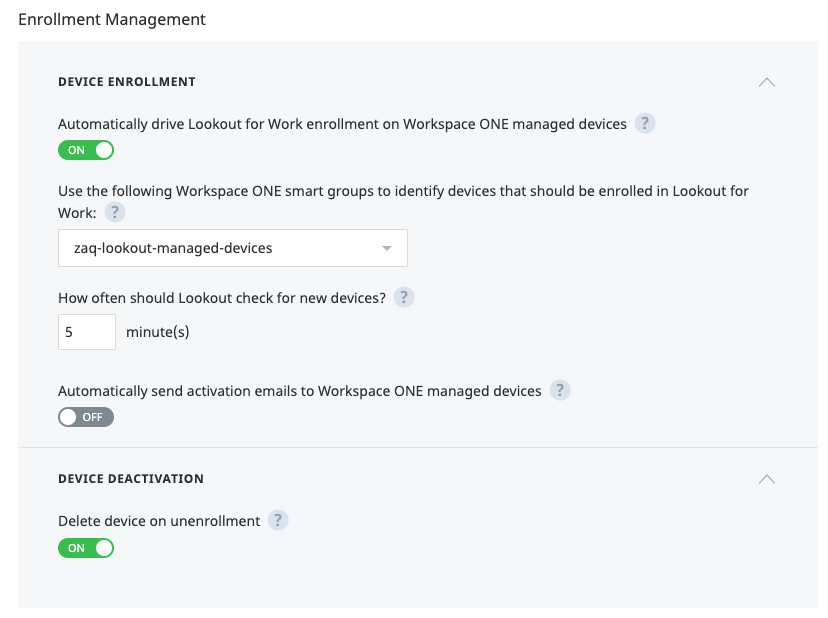
Test & Validate
### Test & Validate
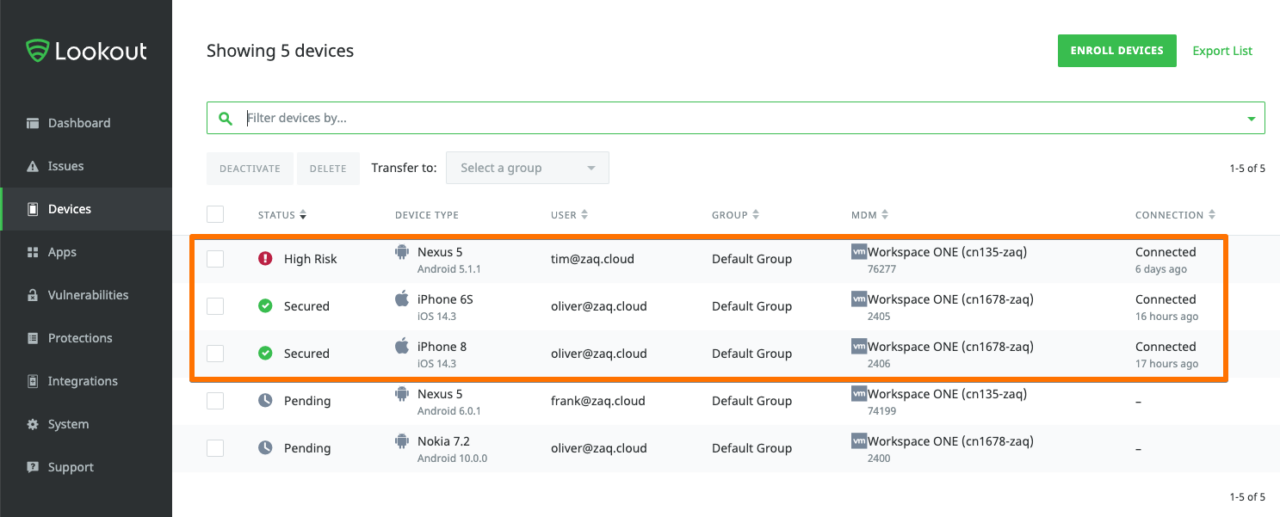
# After saving Connector configuration Lookout will do the following:
- sync the correspondent WS1 UEM managed devices into Lookout
- It will reference each device to the Connector in the device list overview
- It will tag the device in Lookout, and push the correspondent tag to WS1 UEM,
e.g. 'Lookout un-enrolled devices' are show in Lookout as PENDING, and show up in WS1 UEM with Customer Tag MTP_NOT_ACTIVATED 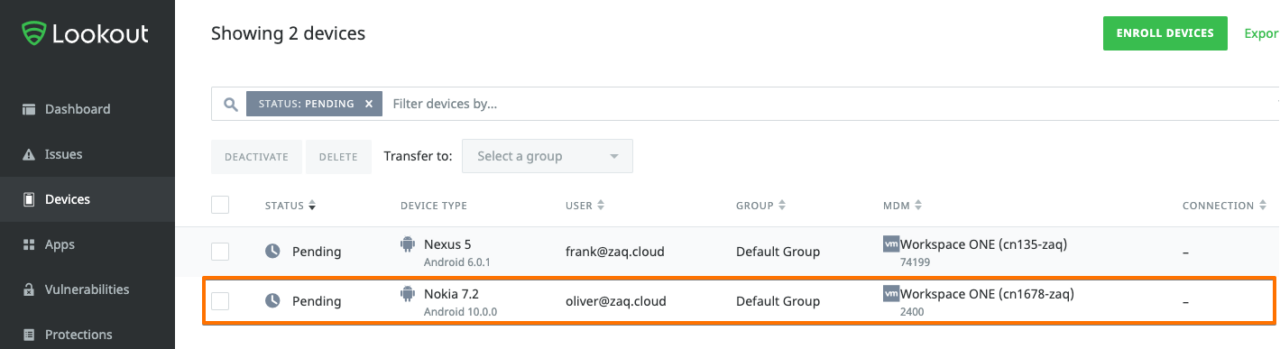

Step 3: Lookout Enrollment of Devices
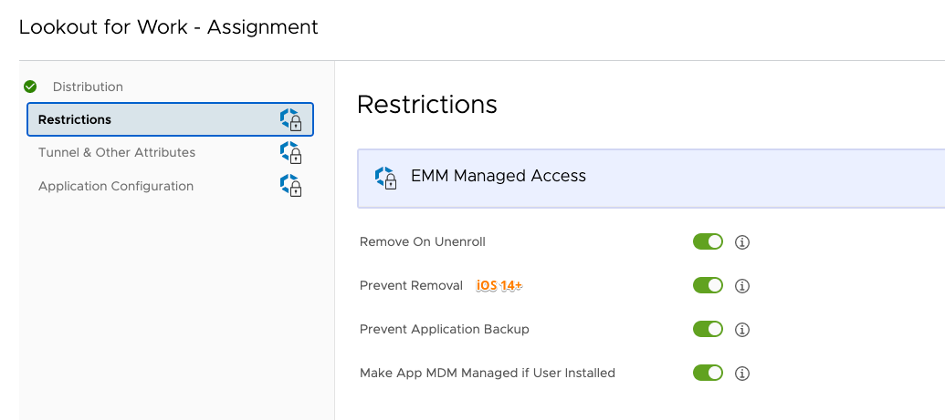
WS1 UEM – App config for “Lookout for Work” – iOS
### WS1 UEM - App Configuration for "Lookout for Work" - iOS
# Select the correct app in App Store for Enterprises: Select "Lookout for Work" apps
- Be aware of Consumer version called "Lookout" - that's the mistake I did first time :)
- Deploy as PUBLIC or (device-/user-based) VPP APP - VPP recommended
- Select intended restriction with App
- Lookout Deployment Guide 2020-01 pre-config values are correct
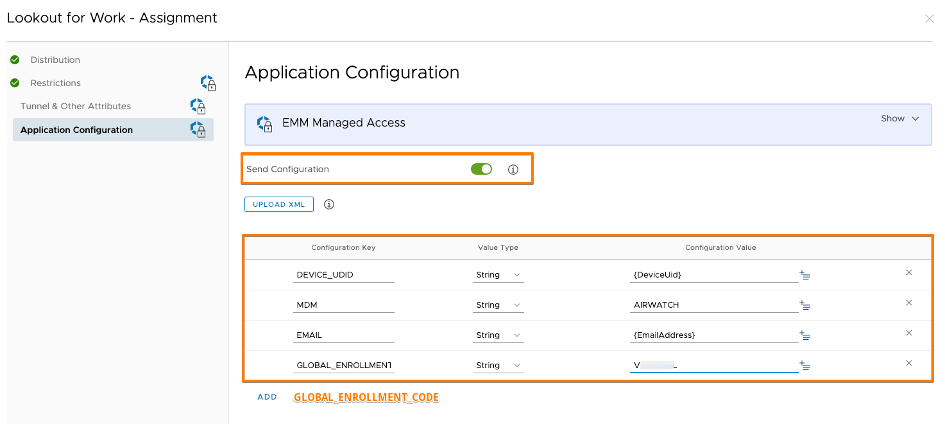
- Lookout will use DEVICE_UDID attribute to map the correspondent WS1 UEM device
### iOS App Configuration - Simple Copy / Paste
Configuration Key ; Value Type ; Configuration Value
DEVICE_UDID ; String ; {DeviceUid}
MDM ; String ; AIRWATCH
EMAIL ; String ; {EmailAddress}
GLOBAL_ENROLLMENT_CODE ; String ; <YourCode>
WS1 UEM – App config for “Lookout for Work” – Android
### WS1 UEM - App Configuration for "Lookout for Work" - Android
# Select the correct app in App Store for Enterprises: Select "Lookout for Work" apps
- Be aware of Consumer version called "Lookout" - that's the mistake I did first time :)

### App Deployment + Config
# "Many ways to Rome" deploy the Lookout app on Android Enterprise enrolled
- For this demo the Managed Google Play Store version was used with Google Managed App Configuration feature

### ATTENTION: The Lookout Deployment Guide 2020-01 pre-config values are NOT CORRECT
# For recent Android changes please refer to: https://enterprise.support.lookout.com/hc/en-us/articles/360057057993-Release-Notes-October-2020
# E-Mail Field is not mandatory anymore
# HSM Key value = DISABLED: In case of problems you may want to switch to SELECT 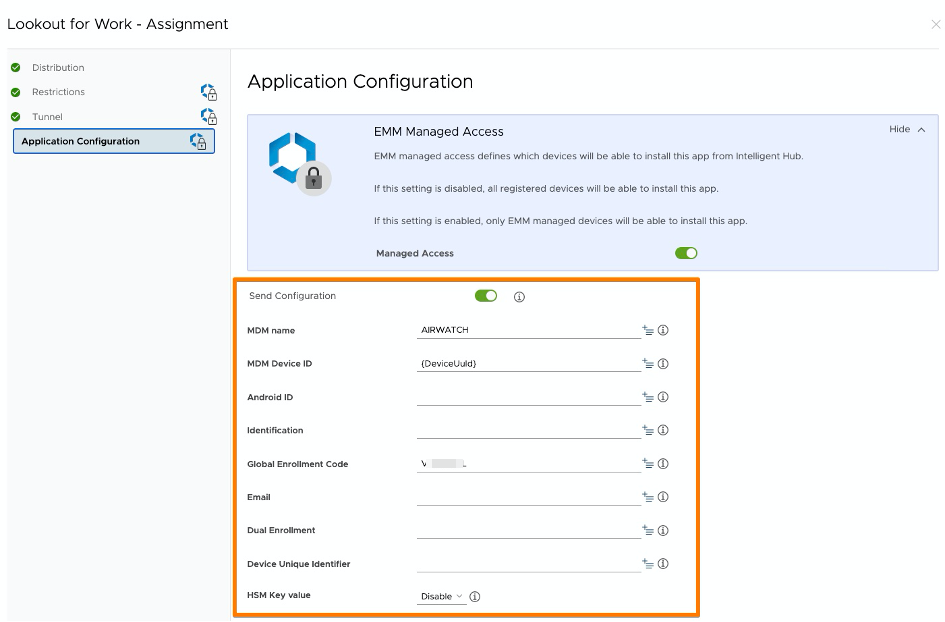
Lookout – Enroll Device
### Lookout - Enroll Device
# You can enroll devices into different Lookout Groups thus defining different target group security policies
# End-user experience
- Once the user launches "Lookout for Work" app, the device should automatically connect to its Lookout tenant
- Amount of pop-ups to user depends on activated feature set in Lookout Console
- Lookout System Engineers have a range of finetuning option which are not part of this blog
# Admin experience
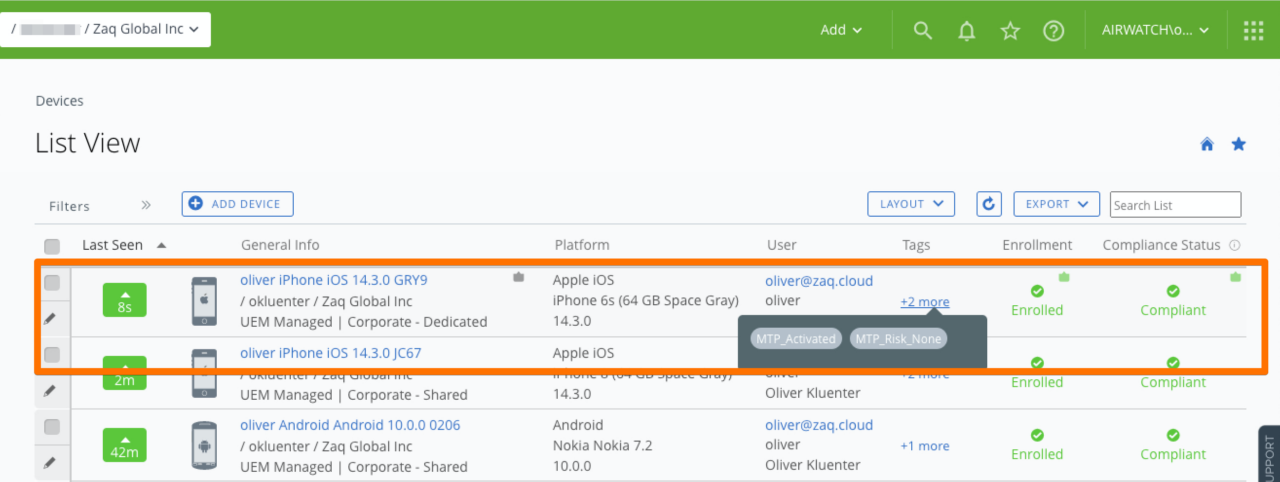
- Device gets registered in Lookout + will be mapped to correspondent WS1 UEM device
- Device gets a new Lookout Status which will be set to correspondent WS1 UEM device using Custom Tags
- Depending on the Lookout davice status => multiple WS1 UEM Custom Tags per device
- Depending on the WS1 UEM Custom Tag you can trigger an automated actions
Step 4: Lookout – Enforce Security Threads
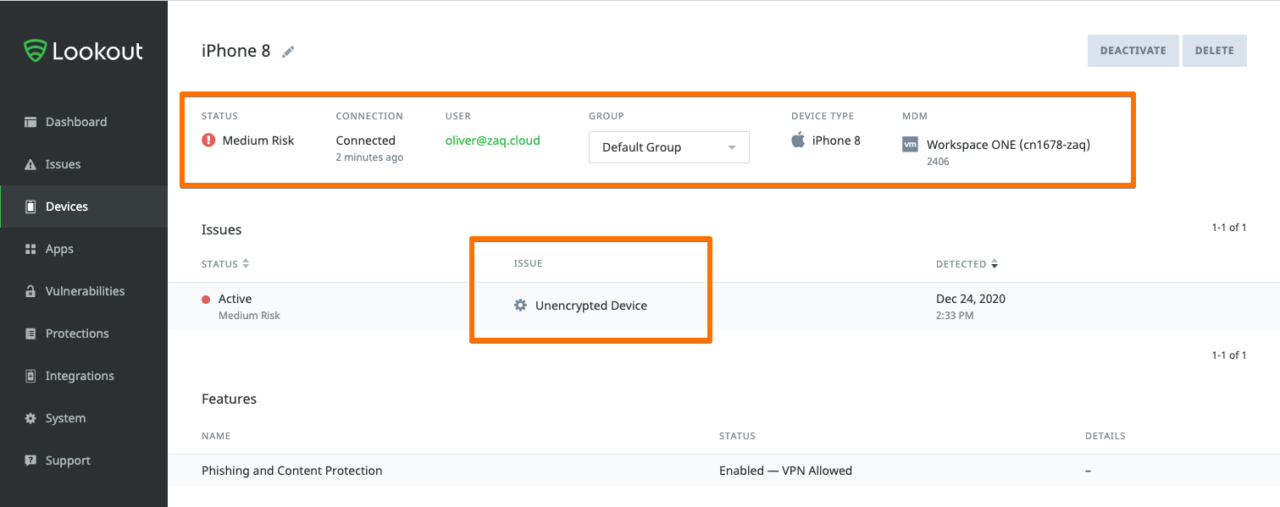
### Lookout - Enforce Demo Threads
# Lookout has multiple Thread Detection components:
- Device Policies incl. Jailbreak detection
- Phishing + Content Protection (Safe Proxy Browser using local VPN)
- On-Device Thread Protection (Device actions upon specific Browser URLs)
# Simple Demo Use cases triggering WS1 UEM Custom settings applied
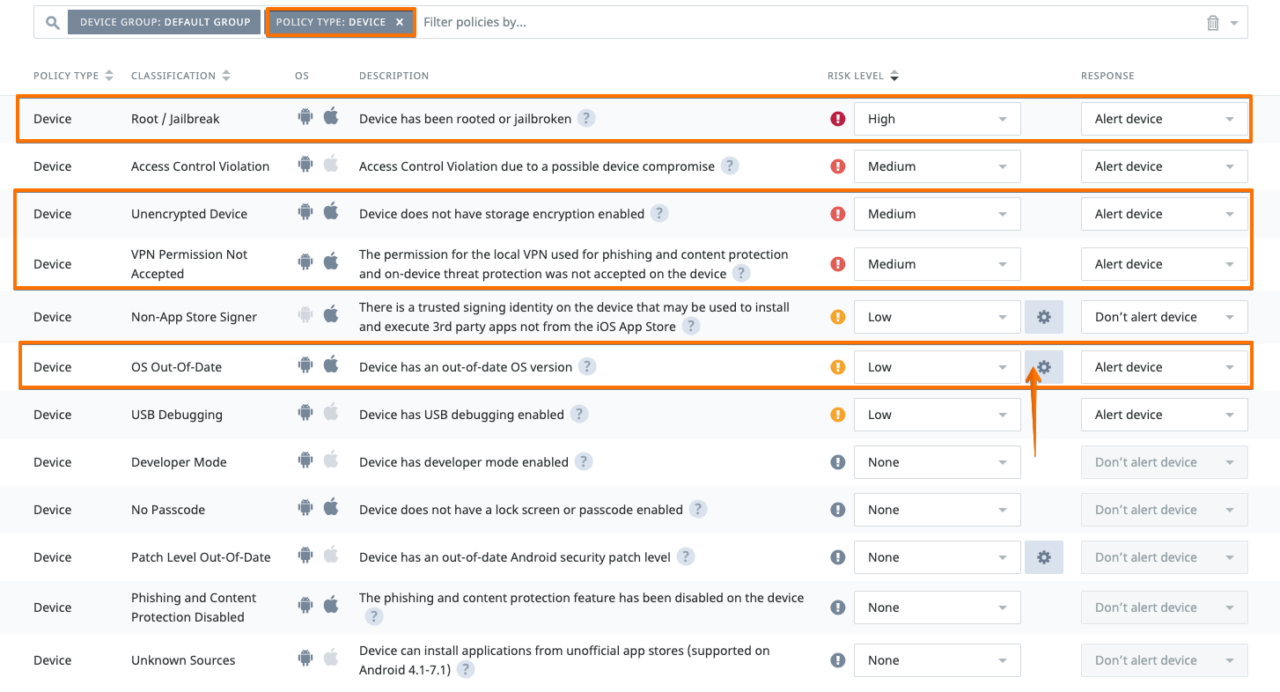
# Lookout Console / Protections / Device Policy
- OS Out-Of-Date ; set a triggering rule
- Unencrypted device ; turn off passcode on iOS device
- Root / Jailbreak ; in case you have compromised device
- VPN Permission Not Accepted : Enable Phishing + Content Protection, and disable the Lookout VPN
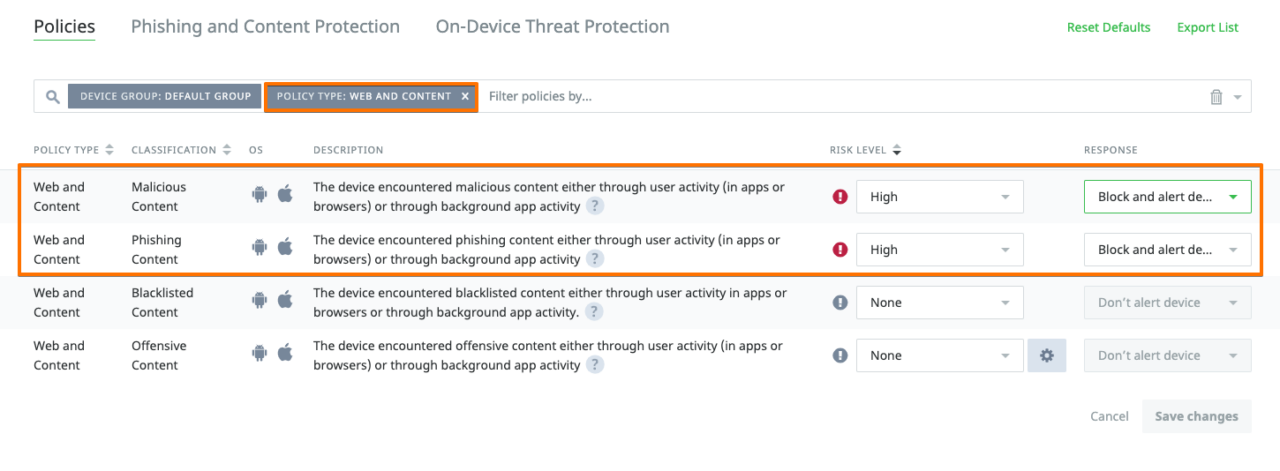
# Lookout Console / Protections / Web & Content Policy
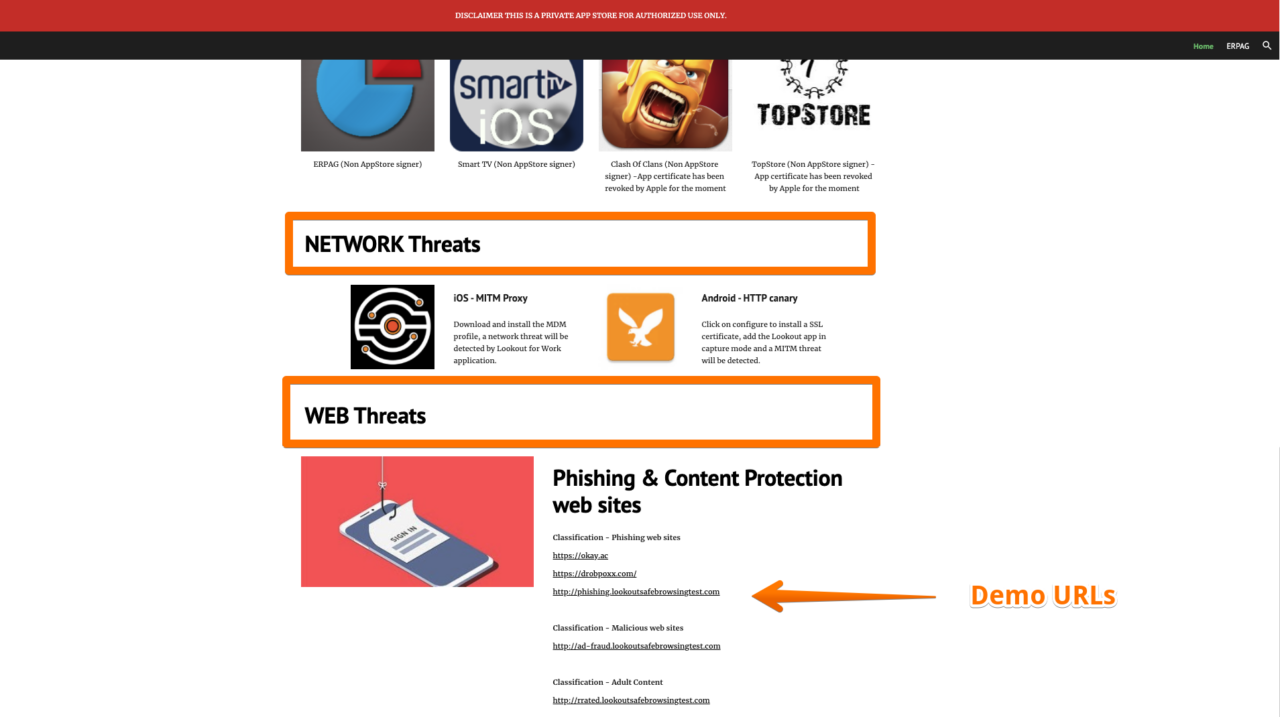
# Trigger demo by using Lookout Demo Malware site
https://sites.google.com/lookout.com/myappstore/homeSet Lookout Policies and use Lookout Demo Malware Site
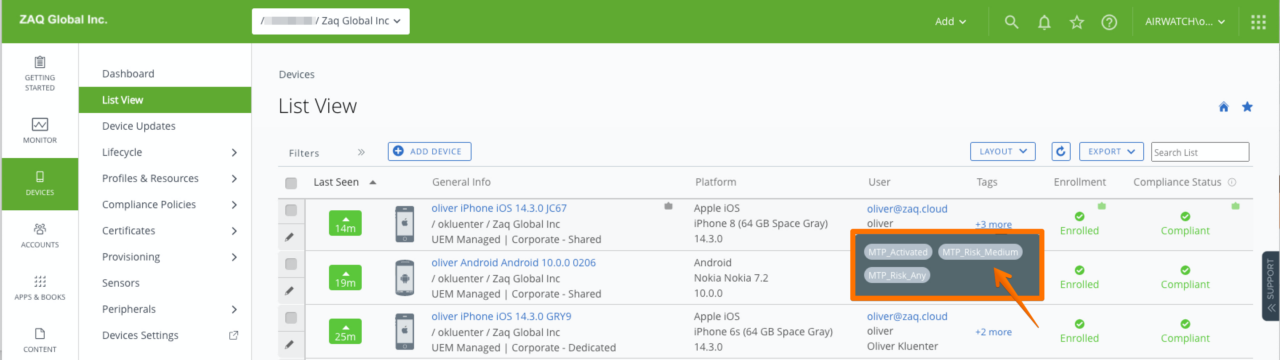
Lookout Console – Feedback
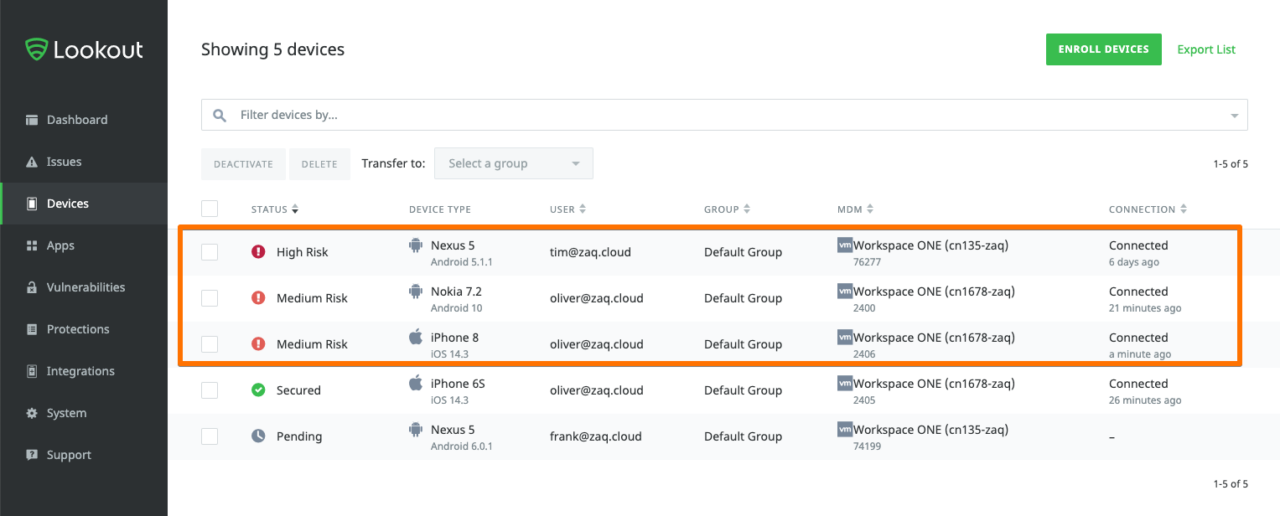
WS1 UEM Console – Custom Tag Feedback
Step 5: Automate WS1 UEM device action upon Lookout risk
Overview
### Automate WS1 UEM device action upon Lookout risk - OVERVIEW
# GOAL: Utilize feature rich WS1 UEM compliance action set
# CHALLENGE: No WS1 UEM compliance triggers based on “Device/Custom Tags” :(
# WORKAROUND: Deploy WS1 UEM “Trigger Apps” to affected devices
# HOW IT WORKS:
- Step 1: Upon Lookout risk low/medium/high => Lookout sets the correspondent WS1 UEM custom tag low/medium/high
- Step 2: WS1 UEM deploy a “Trigger App low/medium/high” to the affected device
- Step 3: WS1 UEM compliance rule => Use “Trigger App” bundle ID to automate security actions (remove apps, deploy compliance profile, …)
Step 1: WS1 UEM – Create Smart Groups for each risk level
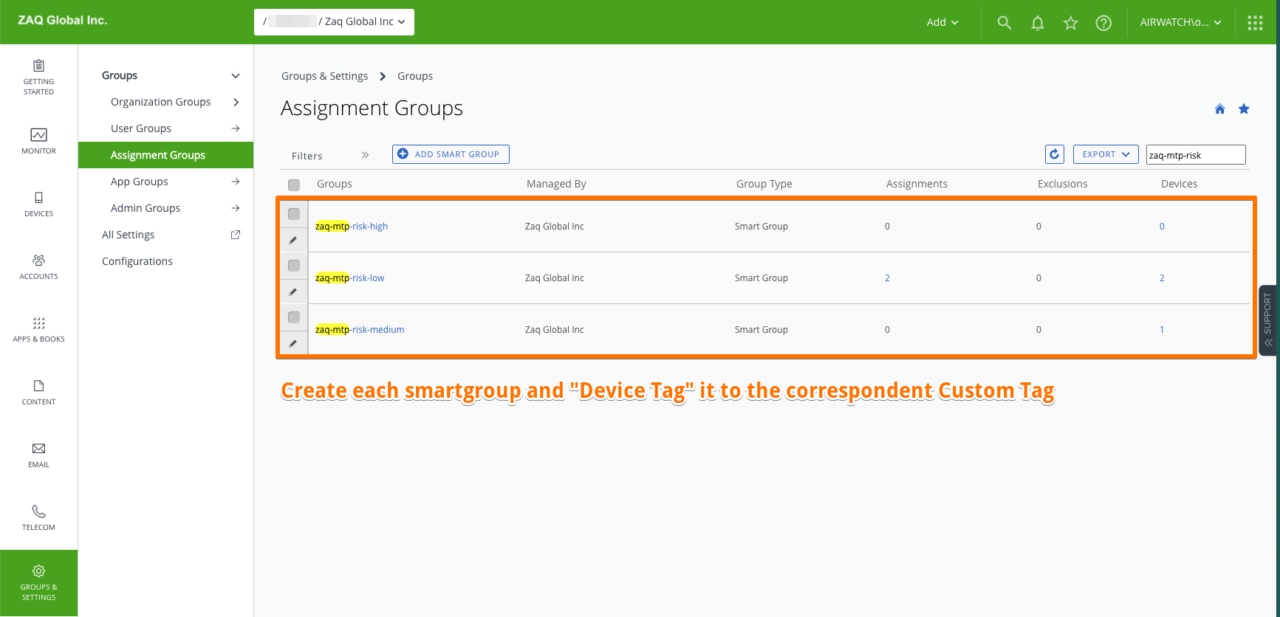
### Step 1: WS1 UEM - Create Smart Groups for each risk level
# Goal: Create Smart Groups based on Device/Customer Tag criteria low/mdium/high
- Mtp-risk-low => assign correspondent Custom Tag, e.g. mtp_risk_low
- Mtp-risk-medium => assign correspondent Custom Tag, e.g. mtp_risk_medium
- Mtp-risk-high => assign correspondent Custom Tag, e.g. mtp_risk_high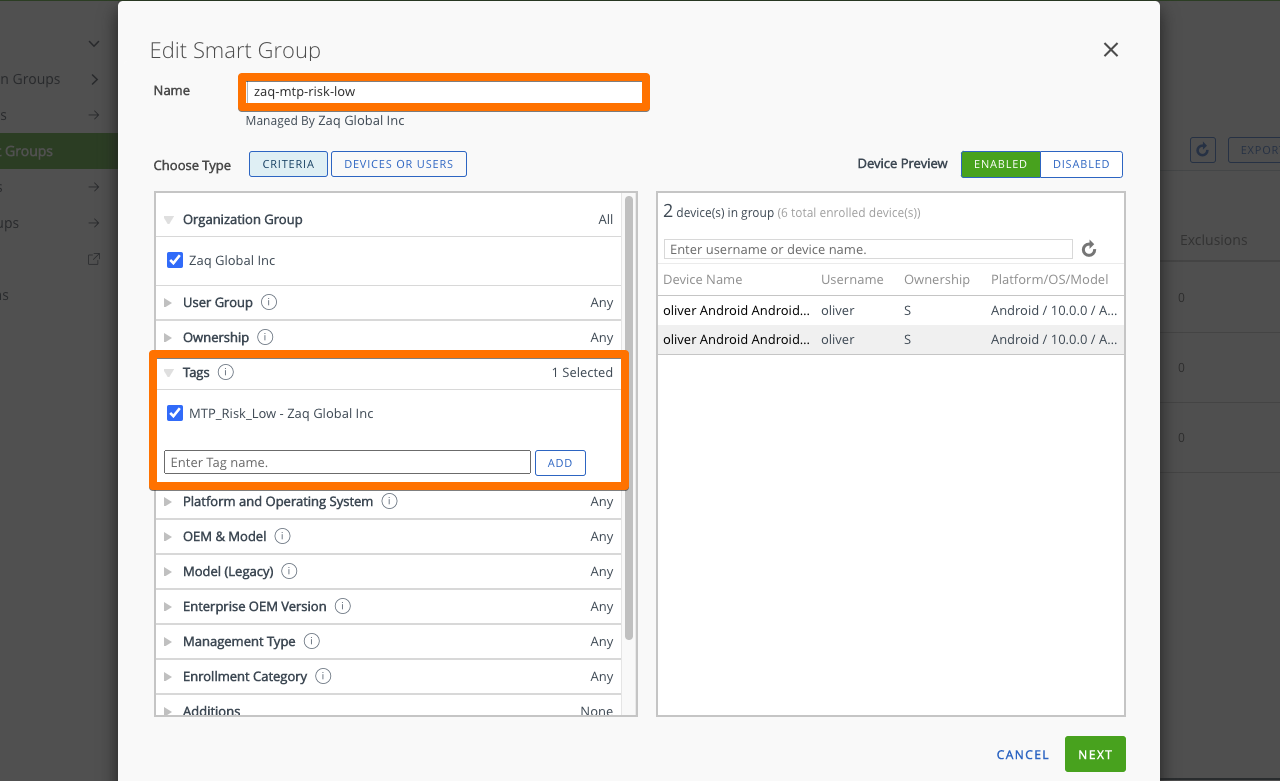
Step 2: WS1 UEM – Create “Trigger Apps low/medium/high”
### Step 2: WS1 UEM - Create 'Trigger Apps' low/medium/high
Goal: Devices with a Lookout risk low/medium/high get the 'TRIGGER APP' automatically installed. Once the TRIGGER APP gets installed, an UEM compliance policy will detect this TRIGGER APP (this may take 5 minutes). Once detected, the compliance engine will execute the related low/medium/high policy.
### ANDROID - using managed Google Play Store "Web Apps"
- Create 3x “Web Apps” in WS1 UEM pointing to any website, e.g. https://lookout.com
- Name the WebApps accordingly, e.g. MtpRiskLow/Medium/High”
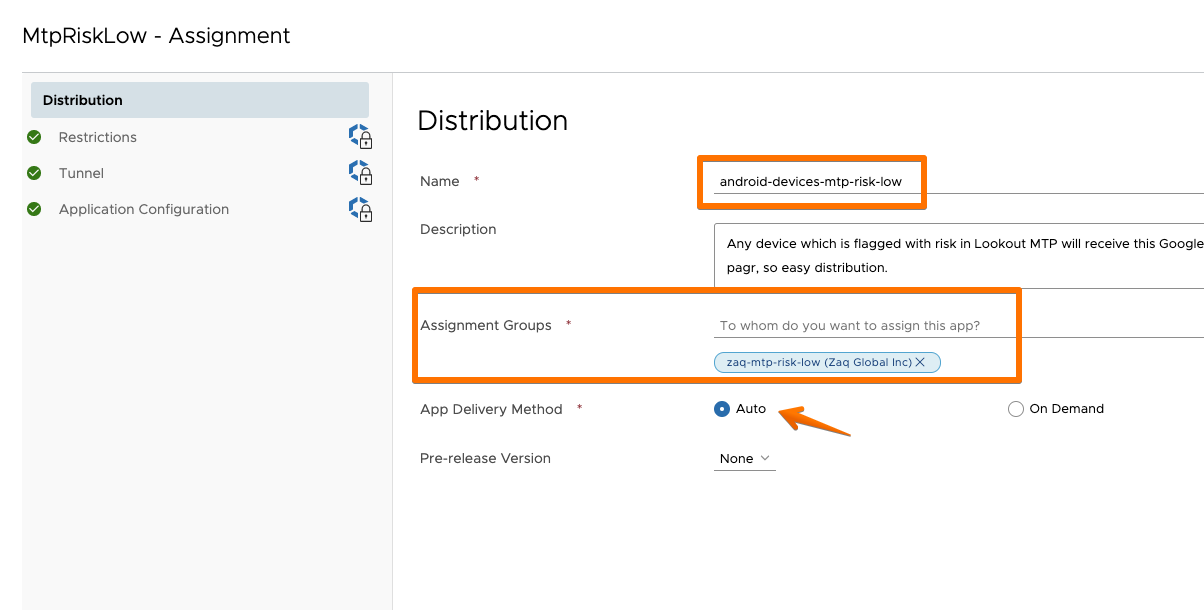
- Assign those Web Apps to correspondent Smart Groups “Low/Medium/High
- Set Web App to AUTOmatic delivery method
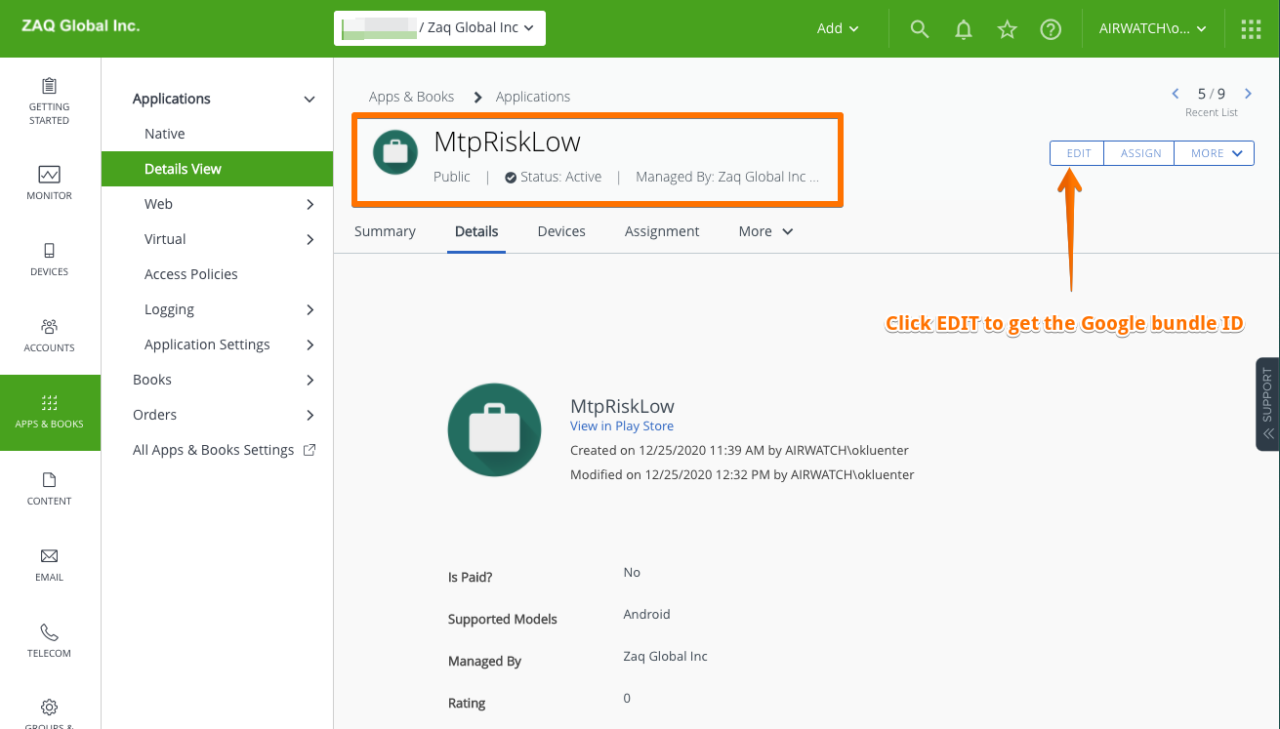
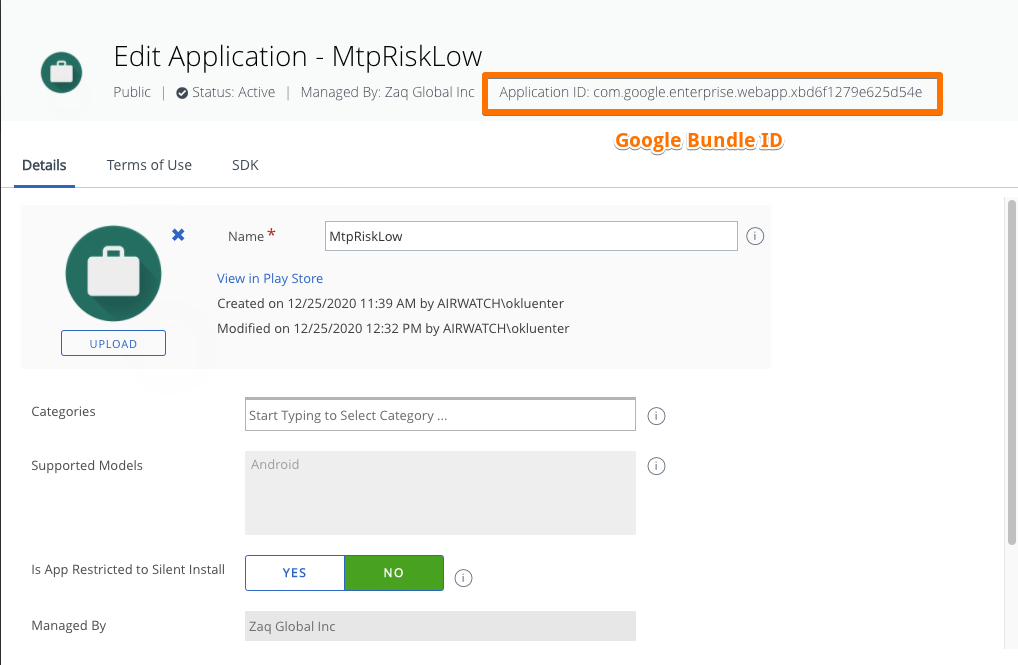
- Note down each / the 3 Bundle IDs
- How to create Web Apps >>> Arsen Bandurian - Blog here
### iOS
- I have not identified yet the best practices Trigger Apps apps on iOS App Store
- SUPERVISED devices with VPP device-based deployment (silent install) and iOS 14.x to disable removal of app will be your best friend 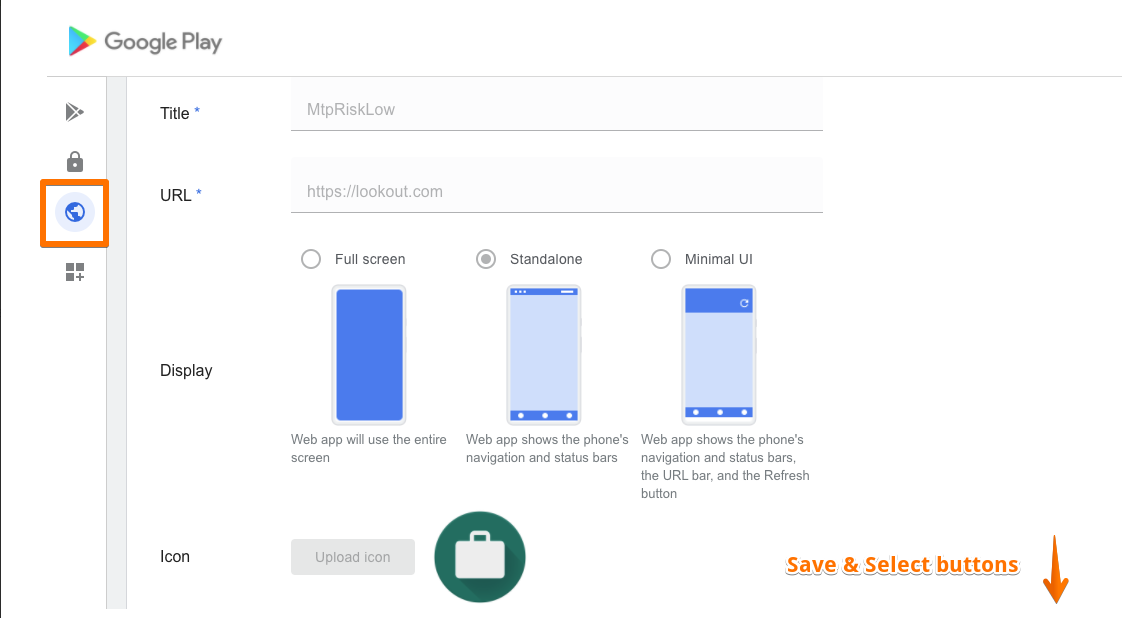
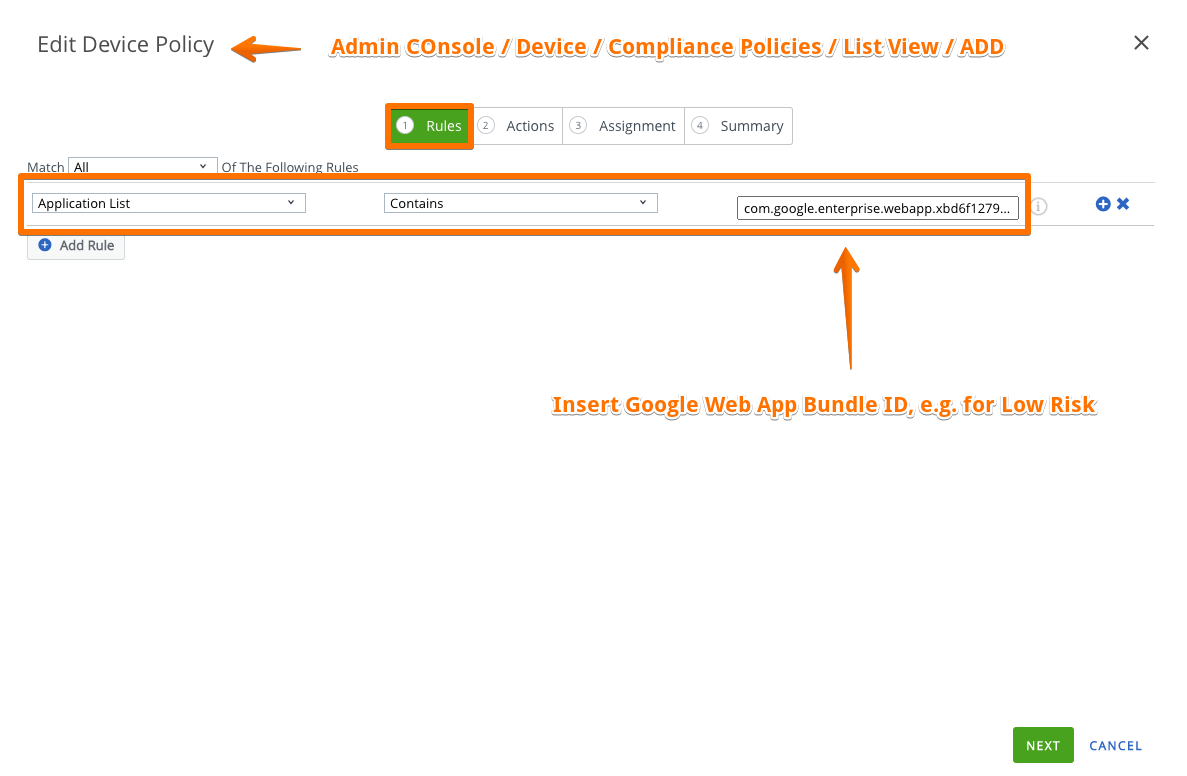
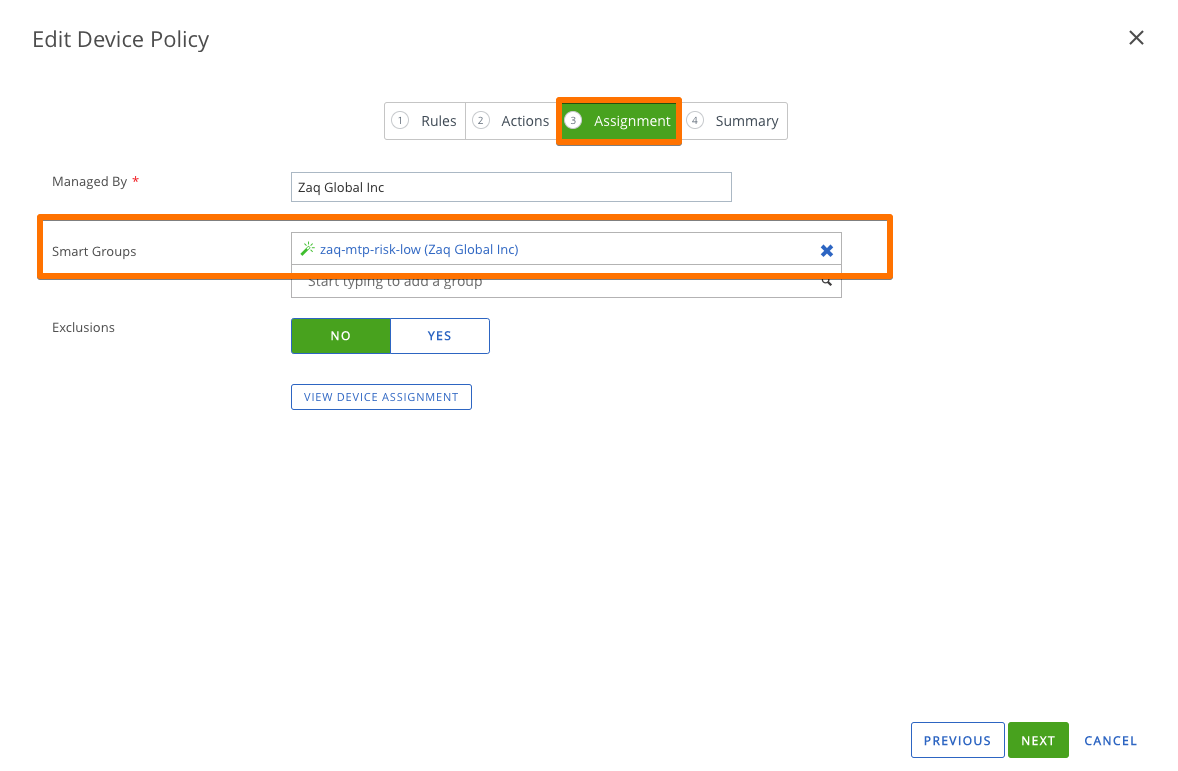
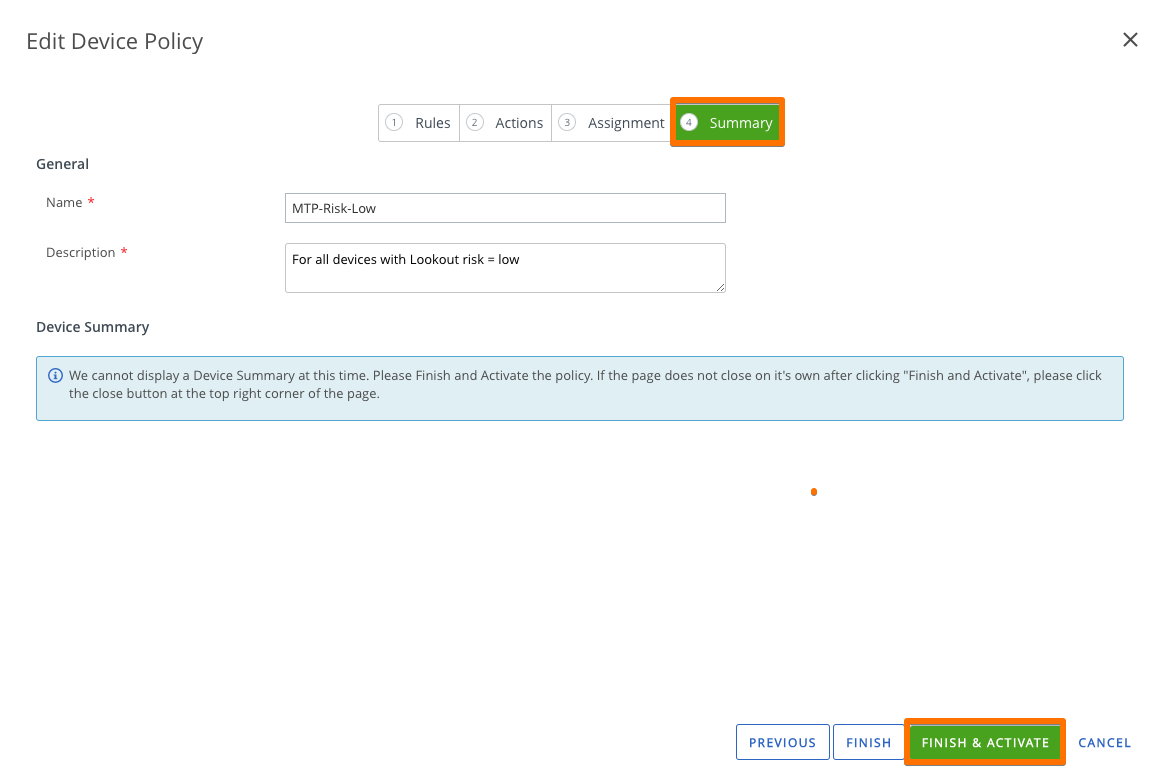
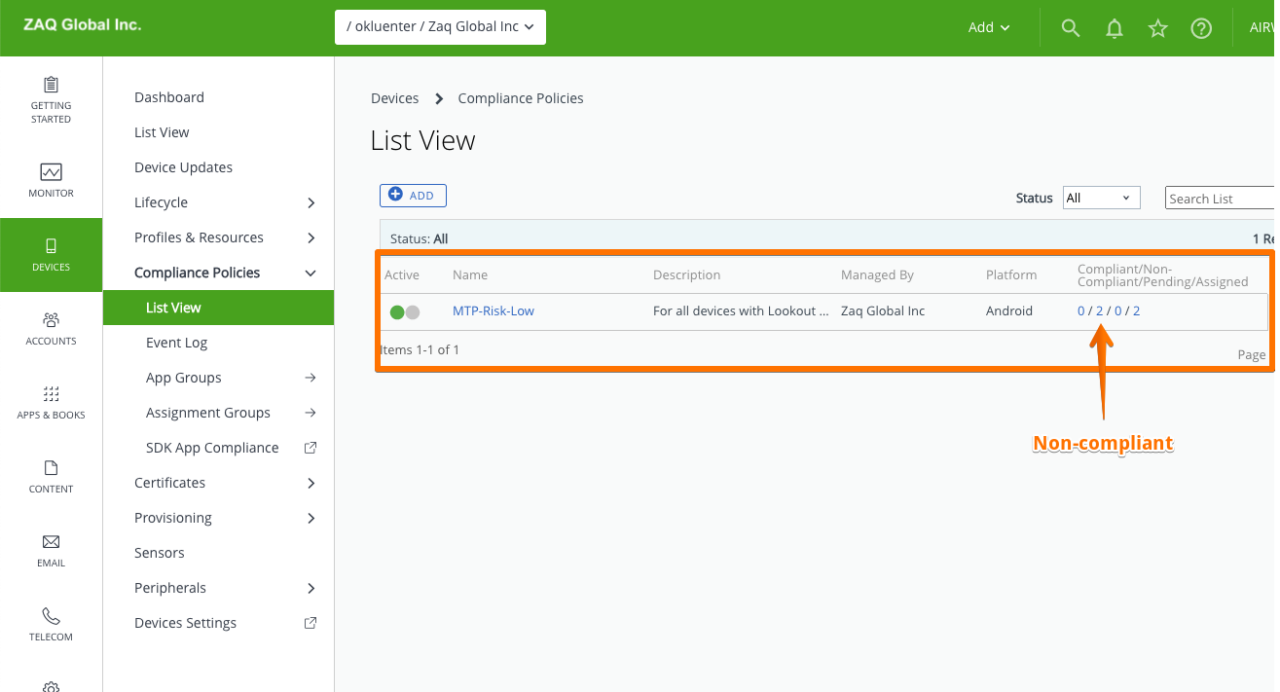
Step 3: WS1 UEM – Define automated Compliance actions
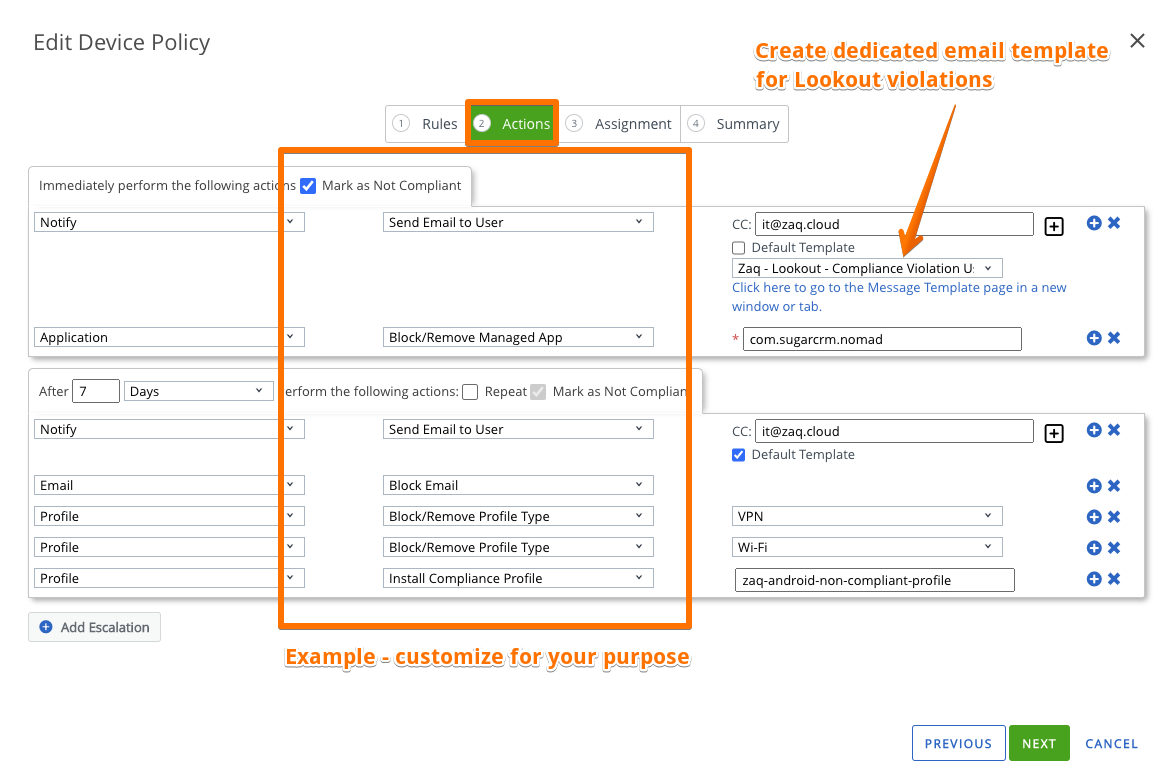
### Step 3: WS1 UEM - Define automated Compliance actions
- Admin Console / Devices / Compliance Policies / List View => ADD a policy
- RULE / TRIGGER: Application contains "bundle ID" => copy/paste the low/medium/high Trigger App Bundle ID
- ACTION: Customermize to your needs (send emails, mark a noncompliant, remove profile and apps, ...)
- ASSIGN: to the correspondent Smart Group high/mdeium/high risk
- FINISH & ACTIVATE
### Helpful hints
# WS1 UEM Compliance rule: don’t use "REMOVE ALL MANAGED APPS" action => this will delete all managed apps including your trigger app ("Chicken-Egg-Problem)
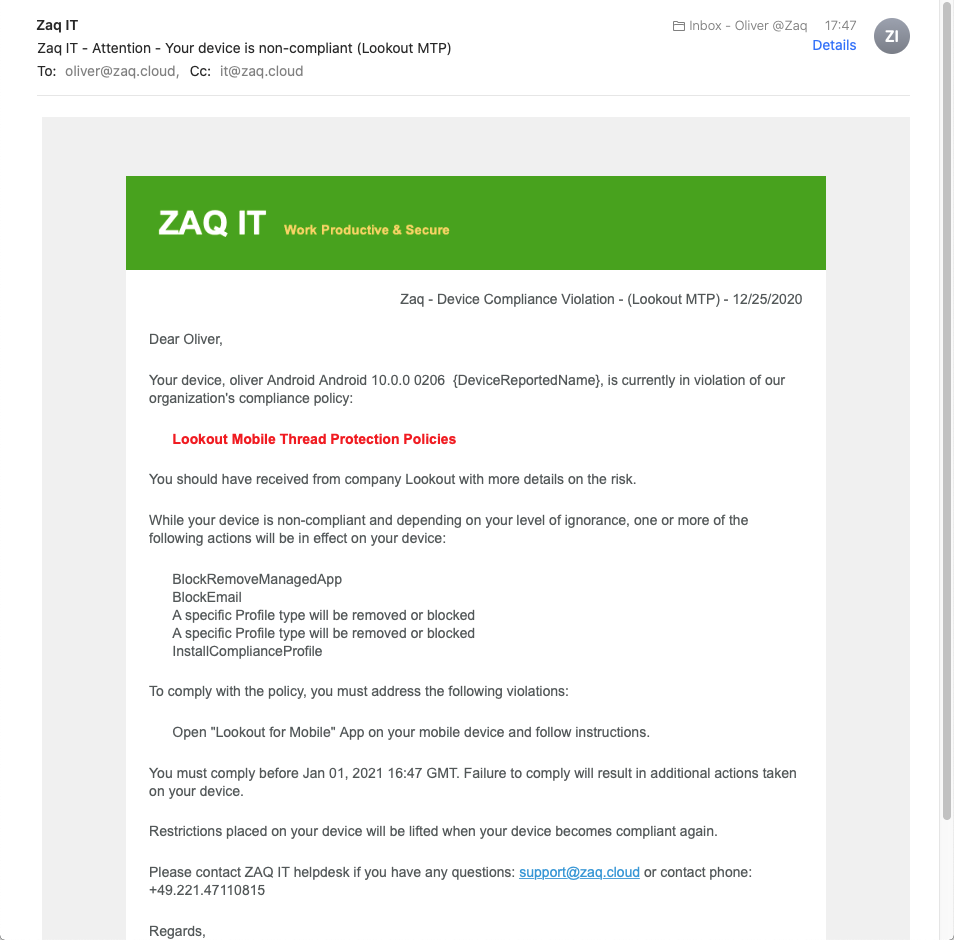
# Emails to users
- You should modify the standard WS1 UEM "compliance violation email template" which asks to uninstall the deployed “Trigger App”
- Ensure the WS1 UEM STMP feature is configured/working for your tenant
### Before you activate the WS1 UEM compliance rule
# Ensure that your affected device are at risk in Lookout Console
# Ensure that correspondent WS1 UEM device has the Device/Custom Tag required
# Ensure that the Trigger App low/mdium/high risk is deployed on the affected device
# Compliance engines runs every 3-5 minutes - so stay tuned